- Install MongoDB >
- Install MongoDB Community Edition >
- Install MongoDB Community Edition on Windows
Install MongoDB Community Edition on Windows
On this page
Important
MongoDB 5.3 binaries are currently available only as release candidates. Release candidates can be used for early testing of new features, but are not suitable for production deployments.
This version of the manual is for an upcoming release and is currently a work in progress.
Overview
Use this tutorial to install MongoDB 5.0 Community Edition on Windows using the default installation wizard.
MongoDB Version
This tutorial installs MongoDB 5.0 Community Edition. To install a different version of MongoDB Community, use the version drop-down menu in the upper-left corner of this page to select the documentation for that version.
Installation Method
This tutorial installs MongoDB on Windows using the default MSI
installation wizard. To install MongoDB using the msiexec.exe
command-line tool instead, see Install MongoDB using msiexec.exe. The
msiexec.exe tool is useful for system administrators who wish to
deploy MongoDB in an unattended fashion using automation.
Considerations
MongoDB Shell, mongosh
The MongoDB Shell (mongosh) is not installed with MongoDB Server. You need to follow the mongosh installation instructions to download and install mongosh separately.
Platform Support
MongoDB 5.0 Community Edition supports the following :red:`64-bit` versions of Windows on x86_64 architecture:
- Windows Server 2019
- Windows 10 / Windows Server 2016
MongoDB only supports the 64-bit versions of these platforms.
See prod-notes-supported-platforms for more information.
Virtualization
Oracle offers experimental support for VirtualBox on Windows hosts where Hyper-V is running. However, Microsoft does not support VirtualBox on Hyper-V.
Disable Hyper-V if you want to install MongoDB on Windows using VirtualBox.
Production Notes
Before deploying MongoDB in a production environment, consider the Production Notes document which offers performance considerations and configuration recommendations for production MongoDB deployments.
Install MongoDB Community Edition
Procedure
Follow these steps to install MongoDB Community Edition using the
MongoDB Installer wizard. The installation process installs both the
MongoDB binaries as well as the default configuration file <install
directory>\bin\mongod.cfg.
Download the installer.
Download the MongoDB Community .msi installer from the following
link:
- In the Version dropdown, select the version of MongoDB to download.
- In the Platform dropdown, select Windows.
- In the Package dropdown, select msi.
- Click Download.
Run the MongoDB installer.
For example, from the Windows Explorer/File Explorer:
- Go to the directory where you downloaded the MongoDB installer (
.msifile). By default, this is yourDownloadsdirectory. - Double-click the
.msifile.
Follow the MongoDB Community Edition installation wizard.
The wizard steps you through the installation of MongoDB and MongoDB Compass.
- Choose Setup Type
You can choose either the Complete (recommended for most users) or Custom setup type. The Complete setup option installs MongoDB and the MongoDB tools to the default location. The Custom setup option allows you to specify which executables are installed and where.
- Service Configuration
Starting in MongoDB 4.0, you can set up MongoDB as a Windows service during the install or just install the binaries.
- MongoDB Service
- MongoDB
The following installs and configures MongoDB as a Windows service.
Starting in MongoDB 4.0, you can configure and start MongoDB as a Windows service during the install, and the MongoDB service is started upon successful installation.
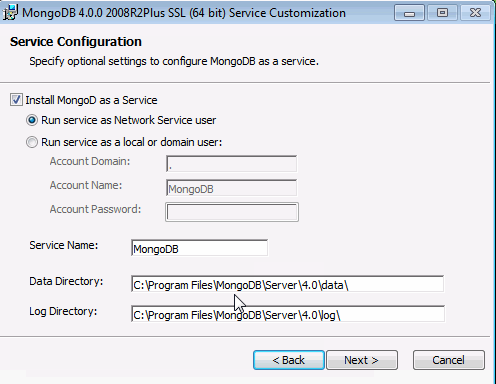
Select Install MongoD as a Service MongoDB as a service.
Select either:
Run the service as Network Service user (Default)
This is a Windows user account that is built-in to Windows
or
Run the service as a local or domain user
- For an existing local user account, specify a
period (i.e.
.) for the Account Domain and specify the Account Name and the Account Password for the user. - For an existing domain user, specify the Account Domain, the Account Name and the Account Password for that user.
- For an existing local user account, specify a
period (i.e.
Service Name. Specify the service name. Default name is
MongoDB. If you already have a service with the specified name, you must choose another name.Data Directory. Specify the data directory, which corresponds to the
--dbpath. If the directory does not exist, the installer will create the directory and sets the directory access to the service user.Log Directory. Specify the Log directory, which corresponds to the
--logpath. If the directory does not exist, the installer will create the directory and sets the directory access to the service user.
The following installs MongoDB only and does not configure MongoDB as a Windows service.
If you choose not to configure MongoDB as a Windows service, uncheck the Install MongoD as a Service.

- Install MongoDB Compass
Optional. To have the wizard install MongoDB Compass, select Install MongoDB Compass (Default).
When ready, click Install.
Install mongosh
The .msi installer does not include mongosh. Follow
the mongosh installation instructions to download
and install the shell separately.
If You Installed MongoDB as a Windows Service
The MongoDB service starts upon successful installation. Configure the
MongoDB instance with the configuration file
<install
directory>\bin\mongod.cfg
.
If You Did Not Install MongoDB as a Windows Service
If you only installed the executables and did not install MongoDB as a Windows service, you must manually start the MongoDB instance.
See Run MongoDB Community Edition from the Command Interpreter for instructions to start a MongoDB instance.
Run MongoDB Community Edition as a Windows Service
Starting in version 4.0, you can install and configure MongoDB as a
Windows Service during installation. The MongoDB service
starts upon successful installation. Configure the MongoDB instance
with the configuration file
<install directory>\bin\mongod.cfg.
If you have not already done so, follow the mongosh installation instructions to download and install the MongoDB Shell (mongosh).
Be sure to add the path to your mongosh.exe binary to your
PATH environment variable during installation.
Open a new Command Interpreter and enter mongosh.exe
to connect to MongoDB.
For more information on connecting to a mongod using
mongosh.exe, such as connecting to a MongoDB instance
running on a different host and/or port, see
Connect to a Deployment.
For information on CRUD (Create, Read, Update, Delete) operations, see:
Start MongoDB Community Edition as a Windows Service
To start/restart the MongoDB service, use the Services console:
- From the Services console, locate the MongoDB service.
- Right-click on the MongoDB service and click Start.
Stop MongoDB Community Edition as a Windows Service
To stop/pause the MongoDB service, use the Services console:
- From the Services console, locate the MongoDB service.
- Right-click on the MongoDB service and click Stop (or Pause).
Remove MongoDB Community Edition as a Windows Service
To remove the MongoDB service, first use the Services console to stop
the service. Then open a Windows command prompt/interpreter (cmd.exe) as an Administrator, and
run the following command:
Run MongoDB Community Edition from the Command Interpreter
You can run MongoDB Community Edition from the Windows command prompt/interpreter (cmd.exe) instead of as a service.
Open a Windows command prompt/interpreter (cmd.exe) as an Administrator.
Important
You must open the command interpreter as an Administrator.
Create database directory.
Create the data directory where MongoDB stores data.
MongoDB’s default data directory path is the absolute path
\data\db on the drive from which you start MongoDB.
From the Command Interpreter, create the data directories:
Start your MongoDB database.
To start MongoDB, run mongod.exe.
The --dbpath option points to your
database directory.
If the MongoDB database server is running correctly, the Command Interpreter displays:
Important
Depending on the
Windows Defender Firewall
settings on your Windows host, Windows may display a
Security Alert dialog box about blocking
“some features” of C:\Program Files\MongoDB\Server\5.0\bin\mongod.exe
from communicating on networks. To remedy this issue:
- Click Private Networks, such as my home or work network.
- Click Allow access.
To learn more about security and MongoDB, see the Security Documentation.
Connect to MongoDB.
If you have not already done so, follow the mongosh installation instructions to download and install the MongoDB Shell (mongosh).
Be sure to add the path to your mongosh.exe binary to your
PATH environment variable during installation.
Open a new Command Interpreter and enter mongosh.exe
to connect to MongoDB.
For more information on connecting to mongod using
mongosh.exe, such as connecting to a MongoDB instance
running on a different host and/or port, see
Connect to a Deployment.
For information on CRUD (Create, Read, Update, Delete) operations, see:
Additional Considerations
Localhost Binding by Default
By default, MongoDB launches with bindIp set to
127.0.0.1, which binds to the localhost network interface. This
means that the mongod.exe can only accept connections from
clients that are running on the same machine. Remote clients will not be
able to connect to the mongod.exe, and the mongod.exe will
not be able to initialize a replica set unless this value is set
to a valid network interface.
This value can be configured either:
Warning
Before binding to a non-localhost (e.g. publicly accessible) IP address, ensure you have secured your cluster from unauthorized access. For a complete list of security recommendations, see Security Checklist. At minimum, consider enabling authentication and hardening network infrastructure.
For more information on configuring bindIp, see
IP Binding.
Point Releases and .msi
If you installed MongoDB with the Windows installer (.msi), the
.msi automatically upgrades within its release series (e.g. 4.2.1 to 4.2.2).
Upgrading a full release series (e.g. 4.0 to 4.2) requires a new installation.